How to Use the GBC Ultima 65 Roll Laminator
Jump To: Figures - Operation & Adjustments
Questions about an issue, adjustment, or operation for your GBC Ultima 65 Roll Laminator? Call us at 1-866-455-9900 for support, service, and repair.
Ultima 65 Operation Manual - Ultima 65-2 Operation ManualFigures:
Operation & Adjustments:
Operating Instructions:
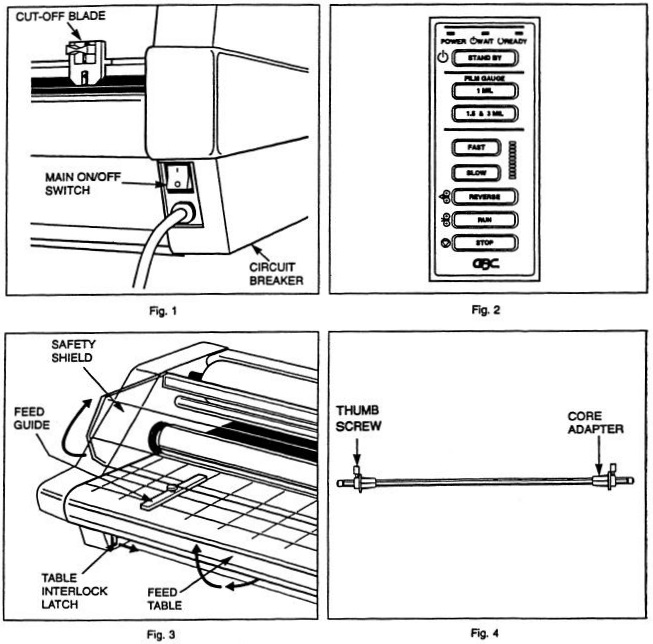
- Tum the laminator on (I) at the main power switch located at the back of the machine (Figure 1).
- CAUTION: Make sure safety shield and feed tray are in the proper position to operate the unit.
- The laminator will automatically default to the 1.0 MIL setting. If you are using 1.5 or 3.0 MIL film, you must manually press the 1.5 or 3.0 MIL button. The laminator will set the speed and temperature for the respective film and 20 lb. bond paper (copier paper). If you are laminating heavier stock press SLOW to reduce the speed for a quality lamination. If the item is lighter increase the speed by pressing FAST. Adjusting the speed control to too high a speed may cause the WAIT lamp to illuminate. You will have to slow the laminator down to ensure proper lamination. Refer to the speed Guide Chart, located on the top right-side cover or section Speed Guide and the Art of Laminating, for speed settings on similar material.
- Do not begin laminating until the WAIT lamp goes out and the READY lamp illuminates. The warm-up time is approximately 10 minutes.
- Position the item(s) to be laminated on the Feed Table.
- Press RUN. The rollers will begin to turn, wait for the heat line to disappear then push the item(s) into the nip point of the heat rollers. Additional items can be laminated without stopping and starting the laminator.
- Should a jam (wrap up) occur, press STOP. Refer to the section Clearing a Film Jam for specific instructions.
- Stop the laminator once all the laminated items completely exit the rear of the machine. CAUTION: Do not reach over the laminator to operate the film cutter.
- The Film Cutter may be used to separate the laminated items from the film web. Position the cutter on either side of the laminator, depress the cutter's handle while sliding the cutter across the film web.
- Allow the laminator to remain powered if it is anticipated that the machine will be used within a short period of time. If the laminator is let for more than 90 minutes without being used the STANDBY button will illuminate. After an additional 30 minutes of non-use the laminator will shut off completely. The POWER and STANDBY lamps will remain illuminated. To reset the unit, press the STANDBY button.
The attached power cord can be disconnected from the receptacle when the laminator will not be used for long periods of time.
Feed Table Removal:
Refer to Figure 3 and follow the procedures to remove the feed table:
- Lift the safety shield to its full upright position.
- Slide the Feed Table latch to the right.
- Lift the table upwards and away from the laminator.
Film Loading & Threading:
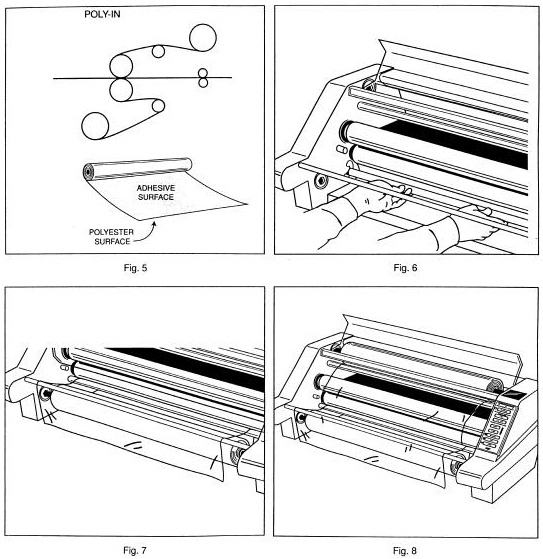
Refer to Figure 5 or the film treading diagram on the feed table of the laminator for illustration of properly loaded film.
The top and bottom rolls of laminating film must be of the same width and be present simultaneously. A small amount of adhesive will "squeeze out" during lamination. Hardened adhesive deposits can damage the heat rollers.
To avoid any damage, rotate the rollers at slowest speed when the WAIT lamp is on. Refer to the section Caring for the GBC Ultima 65 Laminator for instructions regarding removal of the accumulated adhesive.
Adhesive will deposit on the rollers if:
- Only one roll is used.
- Different widths of rolls are loaded together.
- Either roll is loaded adhesive side against a heat roller.
- One or both rolls of film are allowed to run completely off the cores.
The adhesive side of the film is on the inner side of the web (Figure 5). The shiny side of clear film must contact te heat rollers. The dull side of the film contains the adhesive. Use extreme caution when loading delustered (matte) film as both sides appear dull.
Always change the top and bottom supply rolls at the same time. Near the end of each roll of GBC laminating film is a label stating "Warning-End of Roll." The appearance of this label on either the top or bottom roll requires that new rolls of film be installed as soon as the item presently being laminated completely exits the laminator. Do not introduce any additional items into the laminator when the warning label is visible.
Method Using Film Threading Card:
The following procedure uses the film threading card provided with new rolls of GBC film. The laminator should be cool to the touch before proceeding.
- Turn the main power switch on. If the laminator is already hot turn the main power switch off (0) and allow the unit to cool, then turn the machine back on (I). Remove feed table.
- Cut remaining top and bottom film webs between supply rolls and heat rollers. Be careful not to cut the heat rollers.
- Raise the safety shield to its full upright position, pull the top piece of film down.
- Do not allow remaining film to pass through the laminator if there is any exposed liquefied or tacky adhesive. Liquefied or tacky adhesive will deposit on the heat rollers if the following procedure is not observed. Grab hold of the web, top and bottom film, install the feed table under the web. Lower the safety shield and push SLOW to speed 3 or less. Push the REVERSE and guide the web out the front of the laminator. Make certain no exposed adhesive contacts the heat rollers and the film completely exits the laminator.
- Press STOP after the sheets have passed through the laminator.
- Lift the safety shield to the full upright position and remove the feed table.
- Remove the bottom roll of film by sliding the shaft to the fight to release it from the hex shaped brake hub. Loosen locking screw on left retaining collar of film supply shaft, slide collar off. Pull shaft partially out of film tube then push back in to knock out left core adapter. Pull shaft all the way out and rotate tube 180 degrees. Use shaft to knock out remaining core adapter.
- Slide one core adapter into right side of new roll of film ensuring that the film will unroll properly (from the bottom). Slide the film shaft into the core adapter and tube from the right side. Place the other core adapter on the shaft protruding from the left side then replace retaining collar. Tighten locking screw.
- Lower the bottom idle bar (Figure 6).
- Unroll 2 feet (61 cm) of film. Push leading edge under land around bottom idler bar. Slide the idler bar back into place and drape film over bottom film roll (Figure 7). Place the bottom roll of film back on the laminator by sliding the shaft into the round hole of the right-side frame and the left side into the hex shaped brake hub.
- Remove top film supply roll from laminator. Repeat steps 7 and 8 from above ensuring the firm will unroll from the bottom after the film supply shaft it is placed back on the laminator.
- Unroll 2 ft. (61 cm) of film, Drape the film over the top idler bar and completely cover both heat roller.
- Slide the feed tray under the bottom film web that is draped over the bottom roll of film. Reinstall feed table so that the bottom film web is resting on the tray (Figure 8).
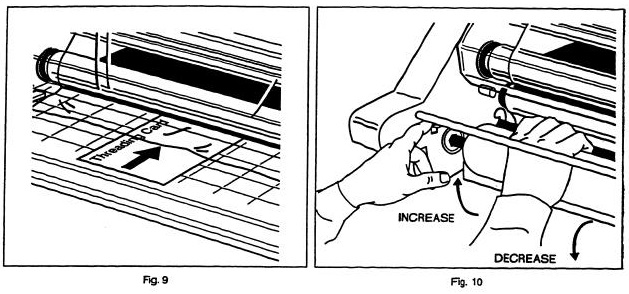
- Slide the threading card between the feed tray and the film web lying on the tray. Gently push into the nip area of the heat rollers. The card should now be guiding both rolls of film into the heat rollers (Figure 9).
- Lower safety shield then push RUN. Watch the leading edge of the threading card to ensure that it enters the nip area of the heat rollers and is being pulled into the laminator. Push STOP once the threading card has exited the rear of the laminator.
- Check the film alignment. See section Film Alignment Procedure for instructions if installed film needs alignment.
Method For Tacking New Film to Existing Film:
? CAUTION THE FOLLOWING PROCEDURE IS PERFORMED WHILE THE LAMINATOR IS HOT. USE EXTREME CAUTION. AVOID CONTACT WITH THE HEAT ROLLERS.
The following describes a method for loading film whereby the existing film present on the heat rollers may be used in place of the threading card to draw the new film through the laminator. The adhesive of the existing firm must be tacky or liquefied. Leading edges of the new film will be overlapped onto the tacky adhesive of the old firm. The existing film and the new film will be pulled through the laminator together.
- Preheat the laminator. Remove the feed tray.
- Cut remaining top and bottom film webs between the supply rolls and heat rollers.
- Raise safety shield to full upright position.
- Do not allow the adhesive side of the film to contact, the heat or pull rollers. Liquefied or tacky adhesive deposited on heat rollers will require the rollers to be cleaned per the section Caring for the GBC Ultima 65 Laminator.
- Remove bottom film supply roll from laminator, lower bottom film guide.
- To load new film on film supply shafts repeat steps 7 and 8 in subsection Method Using Film Threading Card.
- Unroll enough film from the bottom roll of film to slide under the bottom idler bar and tack to the existing film. Slide the bottom idler bar back into place and replace supply roll shaft.
- Replace the top supply roll shaft and unroll enough film to tack to the existing top roll of film.
- Install feed table and lower safety shield.
- Press SLOW for slowest speed setting and press RUN.
- Observe the film being pulled through the laminator to assure that the remaining existing film and the new film are advancing concurrently. Any separation between the films will require stopping the motor immediately and the situation corrected.
- Press STOP once the newly threaded film is completely exiting the laminator.
Film Alignment Procedure:
The film supply shafts of the Ultima 65 Laminator come with pre alignment holes on the right side for 9" (21 cm), 12" (31 cm), 18", (46 cm) and 25" (64 cm) film widths. Loosen the locking screw on the right side retaining collar and move to the corresponding hole to match the width of your roll of film. Tighten the locking screw in the pre drilled hole.
Film Tension Adjustment:
Proper film tension, known as brake tension, is the minimum amount of tension required to eliminate wrinkles in the finished item. The film tension is set at the factory. Periodic adjustments should not be necessary unless other than 1.0 or 1.5 mil GBC film is used, or the lamination is curling up or down. Film tension may be checked occasionally to assure that the adjustment is not required.
The film should be taut. A properly adjusted roll of film should not require excessive force to turn by hand. Film tension should be enough to introduce a minor amount of drag as the film unrolls. Insufficient tension causes wrinkles, while too much tension causes stretching (necking). Uneven tension between the top and bottom rolls create curl. Too much upper tension creates upward curl while too much bottom tension causes downward curl.
- To adjust the bottom brake: Push and hold the brake lever, (Figure 10), located on the left side frame by the roll of film. Rotate the roll of film until the lever engages the internal mechanism.
- Refer to Figure 10 for the proper rotation of the film to increase or decrease the tension.
- Release the brake lever and check the tension by rotating the roll of film. Resistance should be slight, not forced.
- To adjust the top brake repeat steps 1 through 3.
- Laminate some test samples to check for proper tension. Further adjust if necessary.
Clearing a Film Jam (Wrap-up):
Film jams (wrap-up) may occur if the film is loaded on backwards or if the area at which film exits the equipment is blocked. The film, when jammed, wraps around heat or pull rollers. To clear a jam it is necessary to rotate the
rollers in the reverse direction. When pressed, REVERSE on the control panel will cause the rollers to go in reverse.
To clear a jam:
- Immediately stop the laminator by pressing STOP.
- Set the speed indicator to 2.
- Raise the safety shield and remove the feed tray.
- Cut the top and bottom film webs. ? IMPORTANT: DO NOT CUT AGAINST OR INTO THE HEAT OR PULL ROLLERS.
- Grasp the loose ends of the web, pull straight out, install the feed tray so the web is on top of the tray. Lower the safety shield, press REVERSE and guide the film out of the heat rollers.
- Once the jam has cleared the heat rollers press STOP.
- Thread the film per section Film Loading & Threading.
Speed Guide and the Art of Lamination:
Do not attempt to laminate abrasive or metal objects such as staples, paper clips and glitter as they may damage the heat or pull rollers.
Do not force items into the nip area of the heat rollers. An item that is not easily drawn into the laminator by the heat rollers is probably too thick to laminate.
Wrinkles may result if an attempt is made to reposition an item once it has been grasped by the heat rollers.
Do not stop the laminator before an item has completely exited the pull rollers. Even a momentary stop will cause a mark (heat line) on the laminated item.
Good, consistent lamination is a result of combining proper heat, tension, and dwell time. Dwell time is the amount of time the material to be laminated is compressed between the heat rollers and is control by the speed control. When one of the film gauge buttons is selected the laminator automatically sets the speed and temperature for that film and 20 lb. paper.
As a general rule thicker items and films as well as dark or full ink coverage, need to run at slower speeds because they extract more heat from the rollers at a quicker rate. Selling the speed control at slower settings gives the laminator longer dwell time thus allowing proper lamination of thick items. Thinner items, such as standard copier paper (20 lb. bond) and tissue paper, extract less heat from the rollers and can be run at faster speeds.
The WAIT lamp may illuminate if the speed is set too fast for the material being laminated. Either lower the speed setting or press STOP and wait until the READY lamp illuminates.
Operation of the laminator for more than thirty minutes at a time may necessitate a lower speed setting. It is recommended that during periods of long runs the items being laminated are alternated between thick and thin. Do not combine thick and thin items at the same time as this will result in a poor edge seal around the thinner material. If you are unsure that the laminators set at the proper speed for your item, run a test piece (scrap) of the same or similar material through the laminator. This procedure is recommended because rotating the heat rollers prior to lamination will more evenly distribute the heat. Make speed adjustments as necessary.
The following chart provides general guidelines for proper speed settings to use on certain materials and laminating film combinations. This chart is only a general guide. Different settings may become necessary as the warmup time, lamination time and materials change.
Speed Guide Chart:
| Material | 1.0 Mil (.0010") | 1.5 Mil (.0015") | 3.0 Mil (.0030") |
|---|---|---|---|
| Newspaper 20lb Copy Paper Magazine Stock Tissue Stock | 8-10 | 8-10 | 3-4 |
| Construction Paper Posters | 5 | 5 | 1-3 |
| Index Cards File Folders Poster Boards | 1-3 | 1-3 | 1-2 |
Caring for the GBC Ultima 65 Laminator:
Skyline offers cleaning kits as well as Extended Maintenance Agreements.
The only maintenance required by the operator is to periodically clean the heat rollers. The following procedure will help keep the heat rollers free of adhesive that has been deposited along the edge of the laminating film. Proper alignment of the rolls of film reduces the amount of "squeeze out".
? CAUTION: THE FOLLOWING PROCEDURE IS PERFORMED WHILE THE LAMINATOR IS HOT. USE EXTREME CAUTION.
? WARNING: Do not apply cleaning fluids or solvents to the rollers.
? WARNING: Do not attempt to laminate adhesives marked "Flammable".
- NEVER clean rollers with sharp or pointed objects.
- Hardened adhesive deposits on the rollers can cause damage to the rollers. Rotate the rollers at the lowest speed setting on the control panel.
- Do not laminate glitter and/or metallic items to prevent damage to the rollers.
- Remove the film from the laminator following the procedure outlined in the section Film Loading & Threading.
- Preheat the laminator until the READY lamp illuminates.
- Rub the top and bottom heat rollers with a 3MTM Scotch-BriteTM pad.
- Install the feed table and lower the shield.
- Press RUN to rotate the heat rollers to an unclean portions. Press STOP. Continue this process until the complete surface of both rollers are clean.
- Follow the procedure in section Film Loading & Threading: Method Using Film Threading Card to reload the laminator.
Note: Do not use metal scouring pads to clean rollers.